How to convert PDF to flash via programming C#?
For developing software with functions around flash, some time we need to use programming C#. And when you need to create flash from PDF together with programming C#, the following article will be helpful for you. VeryDOC PDF to Vector Converter can be used to convert PDF to flash by programming or scripting languages. Please check more information about this software on homepage, in the following part, let us check how to use this software.
Step 1. Download PDF to Vector Converter
- There are different licenses of this software, please choose the proper version according to your needs. And this is Windows application, it can not work under Mac, Linux system for now.
- When downloading finishes, there will be an zip file. Please extract it to some folder then you can find the examples and executable file. You’d better download SDK version as there are more examples directly related programming C#.
Step 2. Convert PDF to Flash from programming C#.
- When you use this software, please refer to the usage and examples.
- Here are some programming C# code examples for your reference:
Sample code #1 (C# example),
Make use of the PROCESS class available in SYSTEM.DIOGNOSTICS namaspace, use the following piece of code to execute the pdf2vec.exe file,
~~~~~~~~~~~~~~~~~
using System;
using System.Collections.Generic;
using System.Linq;
using System.Text;
using System.Diagnostics;
namespace ConsoleApplication1
{
class Program
{
static void Main(string[] args)
{
Process proc = new Process();
proc.StartInfo.FileName = @"C:\\pdf2vec.exe";
string strArguments = "";
strArguments += "-swfburst";
strArguments += " D:\\temp\\sample.pdf D:\\temp\\out.swf";
Console.WriteLine(strArguments);
proc.StartInfo.Arguments = @strArguments;
proc.Start();
proc.WaitForExit();
}
}
}
~~~~~~~~~~~~~~~~~
Sample code #2 (C# example),
Please by following steps to call pdf2vec.exe inside a special user account,
1. Please download and install EXEShell COM Library (freeware) from following URL first,
https://www.verydoc.com/exeshell.html
https://www.verydoc.com/download/exeshell.zip
2. Please use following C# code to run the conversion inside a special user account,
~~~~~~~~~~~~~~~~~
using System;
using System.Collections.Generic;
using System.Linq;
using System.Text;
namespace ConsoleApplication1
{
class Program
{
static void Main(string[] args)
{
System.Type otype = System.Type.GetTypeFromProgID("exeshell.shell");
Object o = System.Activator.CreateInstance(otype);
otype.InvokeMember("RunCommandLine", System.Reflection.BindingFlags.InvokeMethod, null, o,
new object[] { "UserName", "Password", @"C:\pdf2vec.exe ""C:\test.pdf"" ""C:\out.swf""" });
otype = null;
}
}
}
~~~~~~~~~~~~~~~~~
Remark:
You may encounter Error 1314 in some Windows systems when you switch between user accounts, this is caused by permission setting, please by following steps to solve this 1314 Error,
ERROR 1314:
~~~~~~~~~~~~~
1314 A required privilege is not held by the client. ERROR_PRIVILEGE_NOT_HELD
~~~~~~~~~~~~~
To resolve this issue:
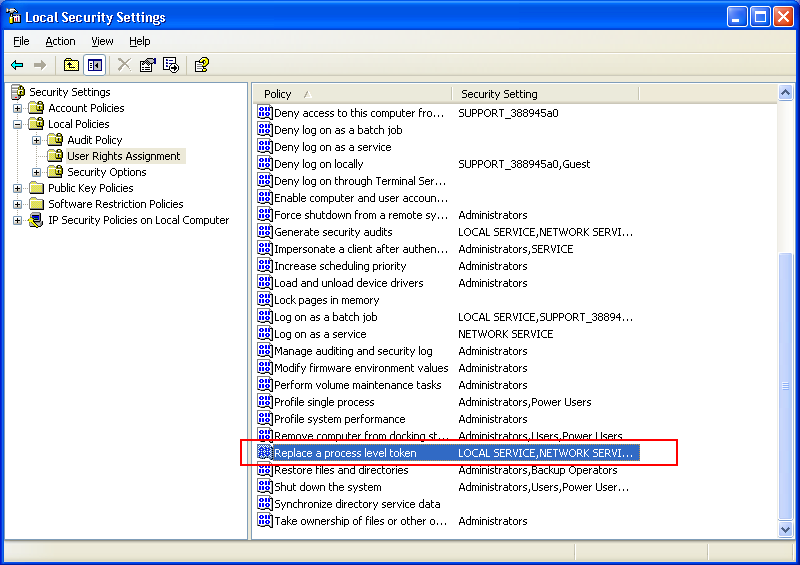
1. Click Start, click Run, type "secpol.msc", and then press ENTER.
2. Double-click "Local Policies".
3. Double-click "User Rights Assignment".
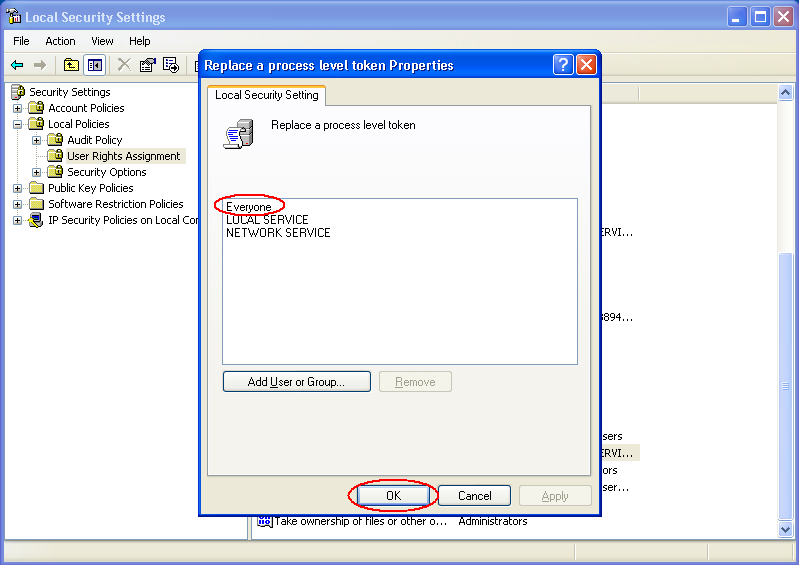
4. Double-click "Replace a process level token".
5. Click "Add", and then double-click the "Everyone" group
6. Click "OK".
7. You may have to logout or even reboot to have this change take effect.
Please refer to following two screenshots to understand above steps,
https://www.verydoc.com/images/err1314-1.png
https://www.verydoc.com/images/err1314-2.png
Please look at following page for the details about ERROR 1314,
https://www.verydoc.com/exeshell.html
This software also allows you to call it from as Visual Basic, C/C++, Delphi, ASP, PHP.NET, etc. and converting PDF to flash is a part of functions of this software, it can give you more than you can image. During the using, if you have any question, please contact us as soon as possible.