Office to PDF Converter

How to view PDF flexibly after converting image/Office to PDF

Please feel free to read this article if you want to know how convert Office/image to PDF and view PDF flexibly after this conversion in Windows systems.

First of all, the software we use for process in this article is VeryDOC Office to PDF Converter, which is a professional tool for Windows users to convert Office to PDF or image to PDF singly or in batches through GUI interface. Moreover, this utility allows you to set PDF properties, e.g., PDF preview mode, etc.. To know more information about this application, please go to homepage of VeryDOC Office to PDF Converter.

This application can provide you with various preview modes of PDF files, so if you would like to know, here are steps to use this software to convert image/Office to PDF and view PDF flexibly below:

1. Install trial version software

Please download installer first from following icon:

Download installer of VeryDOC Office to PDF Converter

Then, please double-click installer and follow setup wizard to install trial version in your computer so that you can use it for later process.

2. Open GUI interface to add source files

Double-click shortcut of this application, and then, its GUI interface could be opened, where you need to click Add files, and then, select source Office files or image files in pop dialog box > click Open, so they could be added into conversion. However, to make adding quicker, you can add source files through drag and drop of Office or image files into processing table directly.

Here is relevant snapshot about this step below:

Add source files for converting Office/image to PDF through GUI interface

3. Set preview mode of PDF files

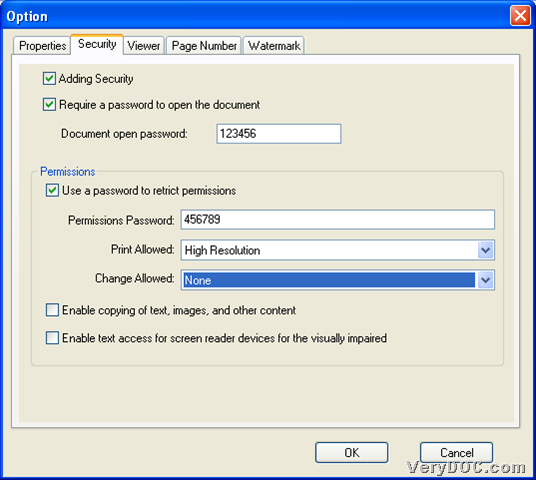
After adding, please click Setting on GUI interface, and then, in pop panel named Option, please click tab Viewer > select one option on dropdown list Initial view, etc., also you can set opening page for typing page number in edit box Open to page number, e.g., 1.

Likely, for user interface display, you can set hiding of menu bar, toolbar, etc.; for Window options, display of center window, fit window, etc., could be selected flexibly. 🙂

Set preview mode of PDF files during converting Office/image to PDF through GUI interface

Finally, you need to click OK so that they could be saved and you can go back to GUI interface. 🙂

4. Set targeting folder and convert image/Office to PDF

At last, please click Convert to PDF And Save As, and select folder as destination folder in pop dialog box > click OK, and finally, targeting PDF files with specific preview mode, could be produced into that folder, and you can notice these PDF files are high-quality. 🙂

By now, this is the end of this article on how to use VeryDOC Office to PDF Converter to convert image/Office to PDF and view PDF flexibly after conversion through GUI interface. To know more relevant articles here, please do not hesitate to visit here frequently. And here is quick entrance for you to purchase VeryDOC Office to PDF Converter below:

Purchase VeryDOC Office to PDF Converter

Office to PDF Converter

How to convert Office to PDF and encrypt PDF via GUI interface

This article aims to show you how to use VeryDOC Office to PDF Converter to convert Office to PDF and encrypt PDF via GUI interface on Windows platforms.

First, you need to install trial version of this application in your computer from following icon:

Download VeryPDF Office to PDF Converter

After download of installer, please double-click this installer and follow setup wizard step by step till it is successful to own trial version in your computer. 🙂 And then, you can use it in later conversion.

And here are steps to use this software to convert Office files to PDF files and encrypt PDF via GUI interface below:

Step1. Run software and add Office files

Please double-click shortcut of this software so that its GUI interface could be opened directly, and then, you need to add Office files like this way:

Click Add Files on GUI interface > select source Office files, e.g., XLS, XLSX, DOC, PPT, etc. in pop dialog box > click Open, then, they can be added into conversion shown as paths in processing form.

Here is relevant picture you can refer to below:

Convert Office to PDF and encrypt PDF via GUI interface of VeryPDF Office to PDF Converter

Step2. Set encryption mode

After adding, please click Setting on GUI interface in order to set encryption mode for PDF files:

After you click Setting, there is option panel popping on screen, where you need to click tab Security, then you need to click check-box Adding Security under that tab so that other edit-boxes and check-boxes could be activated automatically.

Then, open password and owner password of PDF files could be edited:

If you want to set open password, please click check-box Require a password to open the document > type open password in edit box Document open password.

If you want to set owner password, please click check-box Use a password to retrict permissions > input password in edit box Permissions Password. Also, you can set permission limit, e.g., to get no change allowed, please click None on dropdown list Change Allowed, etc.. 🙂

After all setting is finished, please click OK on Option panel, so program helps you save these settings and takes you back to GUI interface.

Step3. Convert Office files to PDF files and encrypt PDF via GUI interface

On GUI interface, it’s time to click Convert PDF And Save As so that you can set targeting folder in pop dialog box > click Ok. Finally, conversion could be started and you can get targeting PDF files in destination folder directly.

At last, thank you for reading this article, which is about how to use VeryDOC Office to PDF Converter to convert Office files to PDF files and encrypt PDF via GUI interface. And for any questions, please add your comments here. And to buy full version of this software, please do not hesitate to click following icon:

Purchase VeryDOC Office to PDF Converter

Office to PDF Converter

How to convert image/Office to PDF and set PDF information

If you would like to know how to use VeryDOC Office to PDF Converter to convert image/Office to PDF and set PDF information, please feel free to read this article here. 🙂

And first of all, if you want to know VeryDOC Office to PDF Converter exactly, welcome to go to its homepage from link above. Or just have a try on trial version:

Download trial version of VeryDOC Office to PDF Converter

If you would like to follow me, please do not hesitate to read the followings:

Step1. Add Office/image files for process

Open GUI interface of this software and follow steps below to add source files:

Click Add Files or Add folders on GUI interface > select right Office/image files in pop dialog box or select folder containing source files in pop dialog box > click Open or OK there, finally, selected files could be added as paths appearing in processing form of GUI interface.

Here is related snapshot below:

Add Office/image files for converting Office/image to PDF through GUI interface

Step2. Set PDF information

When adding is finished, please click Setting on GUI interface so that you can set PDF information:

Click Setting > select tab Properties, then, you can type PDF producer, creator, title, subject, author and keywords flexibly in related edit boxes, and here is related picture you can refer to below:

Set PDF information during converting Office/image to PDF through GUI interface

Finally, after you finish setting PDF information, please click OK on Option panel, and then, program brings you back to GUI interface and these settings also could be saved automatically. 🙂

Step3. Convert Office/image files to PDF file

After you get GUI interface again, please click Convert to PDF And Save As on GUI interface, and then, after you select right folder for saving PDF files, please click Ok, and after a while, VeryDOC Office to PDF Converter helps you convert image/Office files to PDF files and set PDF information, and then, it can add targeting PDF files with specific PDF information into destination folder.

Did you use your trial version VeryDOC Office to PDF Converter to convert Office/image files to PDF files with PDF information through GUI interface? And it is convenient for you to click following icon if you prefer to purchase full version of this software:

Purchase VeryDOC Office to PDF Converter

Anyway, thank you for reading this article here. 🙂

Office to PDF Converter

How to convert Office/image to PDF

This article is about how to convert Office/image to PDF through GUI interface, and if you are interested in it, please follow me in the next paragraphs. 🙂

First of all, please allow me to introduce main application for this process – VeryDOC Office to PDF Converter. It supports converting Office to PDF and image files to PDF files singly or in batches through GUI interface. Besides, this utility allows Windows users to set PDF properties, e.g., PDF encryption, PDF information, PDF combination, etc.. And then, if you would like to know how to use it to convert image/Office file to PDF, here are easy steps for you to refer to below:

Step1. Download and install

If you want to use trial version of this application to process task later, please do not hesitate to click following icon to download installer firstly:

Download installer of VeryDOC Office to PDF Converter

Then, install it in your computer for later conversion of yourself through double-clicking that installer and following setup wizard. And then, trial version of this application is absolutely yours. 🙂

Step2. Run software and add source files

Then, please open software and add source files through one of following ways:

  • Click Add Files on GUI interface > select source files of Office or image in pop dialog box > click Open
  • Click Add folder on GUI interface > select one folder containing dozens of source files > click Ok
  • Drag and drop Office or image files into processing form of GUI interface

After paths of selected source files appear in processing form, it means you add them successfully for conversion later.

Here is relevant snapshot of GUI interface during conversion below:

Convert Office/image to PDF through GUI interface of VeryDOC Office to PDF Converter

Step3. Convert Office/image file to PDF

After you add source files, you can optionally click Setting for PDF properties, e.g., PDF information, PDF passwords, etc., and then, you need to click OK on that pop panel, so those settings could be saved and program takes you back to GUI interface.

Then, you need to click Convert to PDF And Save As on GUI interface, so software can start to convert image/Office file to PDF files singly or in batches, after you select destination folder in pop dialog box. And finally, you will get your targeting PDF files in selected folder in your computer, which has great quality than you ever imagine! 🙂

So, by now, welcome to use full version of VeryDOC Office to PDF Converter to convert image/Office files to PDF files through GUI interface from the following icon, and thank you for reading this article here. 🙂

Purchase VeryDOC Office to PDF Converter

PDF Margin Crop

How to remove speckles during cropping/removing PDF margins

It is easy to use VeryDOC PDF Margin Crop to remove speckles when cropping/removing PDF margins through command line.

Here are details to realize them in Windows systems below:

Step1. Download and install trial software

Please click following icon so that trial installer could be yours, and then, you need to double-click it and follow setup wizard to install GUI and CMD version in your computer, so CMD version could be used in your later process.

Download VeryDOC PDF Margin Crop

Step2. Run command prompt

After installation, please run cmd.exe in your computer in order to open command prompt, which is operating environment of command line for Windows platforms. And then, commands and parameters could be typed directly for later process by yourself. 🙂

Step3. crop/remove PDF margins and remove PDF speckles flexibly

In opened command prompt, you can see the following example to type commands and parameters on your own to fulfill your process:

pdfmc.exe –margin 10x10mm –specklesize 20 C:\in1.pdf C:\out1.pdf

pdfmc.exe –margin 10x10x10x10mm –specklesize 0 C:\in2.pdf C:\out2.pdf

And in the examples above, you may need to know:

  • pdfmc.exe: call executive file “pdfmc.exe” for running software
  • –specklesize 20: remove the speckles which size less than this value,
    default is 20 pixels, also you can type other int value, e.g., 10, 0, etc.
  • ….in..pdf: specify input PDF file before removing PDF margins
  • ….out..pdf: specify output PDF file after removing PDF margins
  • -margin 10mm: Keep margin to 10 mm to left
    -margin 10x10mm: Keep margin to 10 mm to left, top
    -margin 10x10x10mm: Keep margin to 10 mm to left, top, right
    -margin 10x10x10x10mm: Keep margin to 10 mm to left, top, right, bottom

When you type commands and parameters like above, you can start to remove margins of PDF and remove speckles from source PDF files through VeryDOC PDF Margin Crop. And then, PDF files without specific blank margins could be added into targeting folder. 🙂

After you read the illustration above, do you think this software satisfy you? If you want to own full version of VeryDOC PDF Margin Crop, please buy it at purchase page of VeryDOC PDF Margin Crop.