Advanced PDF Editor

How to edit PDF content by Advanced PDF Editor?

VeryDOC Advanced PDF Editor can be used to change PDF content or replace some fonts in batch.In this article, I will take a random PDF file for example to show you how to edit PDF.

Step 1. Download and Install

  • Advanced PDF Editor is GUI version software, so you need to install its software interface. Once downloading finishes, there will be an exe in the downloaded folder. Please double click the exe and follow the installation message.
  • Once the downloading finishes, there will be an icon on the desktop. Please launch this software by double clicking the icon.

Step 2. Edit PDF

  • First, you need to judge PDF property. There are two kinds PDF file:image PDF and text based PDF. When edit text based PDF, please use the following method. The following snapshot is from the software interface. Please add file by clicking button Open.

software interface of PDF Editor

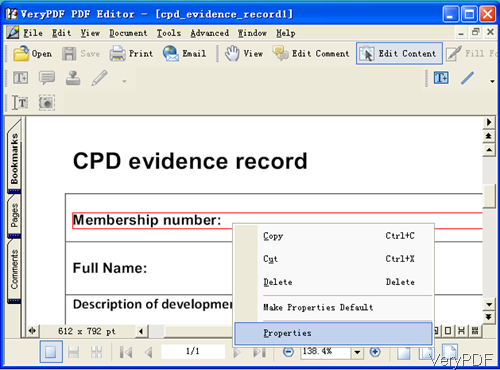
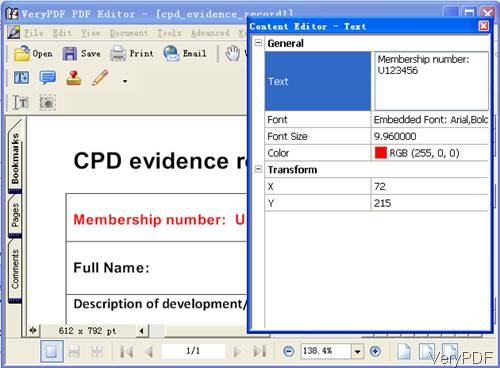
  • When you add file to software interface, please click option Edit Content then double click the the part that you need to edit. Then there will be red rectangle around text. Please right click it then you will see the dropdown list. Please choose option Properties then you will see the following dialogue box.

edit PDF content

  • It is not hard to find that most of the basic fonts information has been shown in the General tab. In the Text part, you can edit the text content. In the Font part, you can edit Embedded font style. In the Font size part, you can change font size. In the Color part, you can change the font color. In the Transform part, you can transform font from X and Y directions.

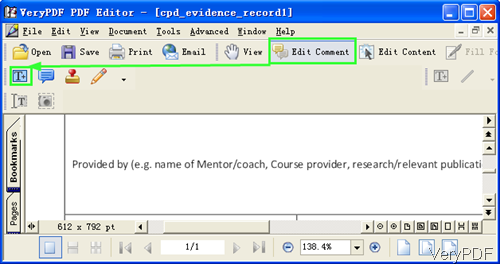
By this method, you can edit content of text based PDF file. Now let us try to edit content of image PDF file. After adding file to software interface, please click option Edit Comment like I showed in the following snapshot.

edit image PDF

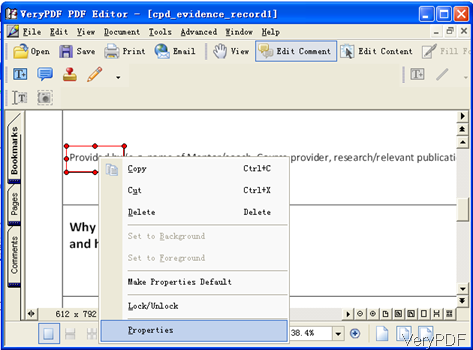
  • Please click option Edit Comment then the icons will go fresh. Please click T icon then the mouse will turn to cross. Please draw the area where you need to edit PDF. Then the frame will go black and please double click it till it goes red like the following snapshot. Please right click the frame and then you will see the dropdown list.

edit image PDF 2

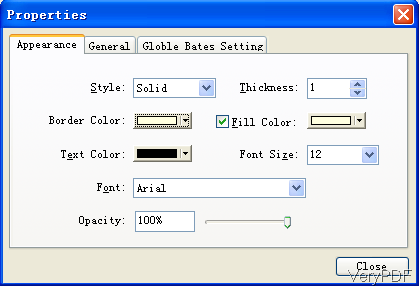
  • Please choose Properties then you will see the following dialogue box. Here please set fill color as white, border as white. Make sure the font size is the same with the original PDF fonts. And you can adjust opacity. Normally 100% is best.

properties

  • When you finishes setting, please click button Close to back to main interface.
  • Then please double click the frame then you can you can input text in it. By this way you can add a new layer on the text which covers the old text.

If you are interested in this software, please buy one then you can use it forever. During the using, if you have any question, please contact us as soon as possible.
PDF Password Remover

VeryDOC PDF Password Remover- remove PDF password in batch

  Have you ever been perplexed by those situations where you can not open some PDF files directly as you need to input the password each time, or  even if you can open PDF files but you can change or edit it, let alone printing? If yes, the following article will be helpful for you. In this article, I will show you VeryDOC PDF Password Remover which can be used to remove PDF password in batch.

Step 1. Download PDF Password Remover

  • This software only works under Window system, if you are Mac user, please download the Mac version.
  • And this software is GUI version, so you need to install it. The installation may take 5-10 seconds. And the installation is quite simply, please double click the exe file and follow installation message then you can install it easily.

Step 2. Remove PDF password

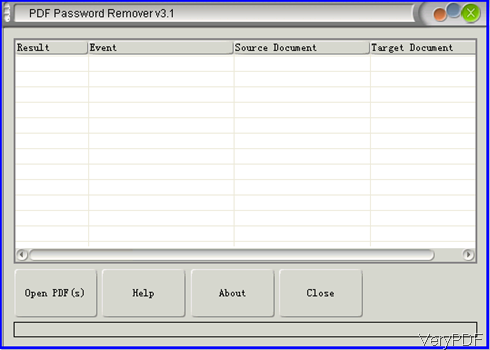
  • The following snapshot is from the PDF Password Remover interface. Please note that this software only can remove owner password protected PDF password directly. When you need to remove the open password, you need to know and input the password during removing process.

software interface of PDF password remover

  • Click button Open to add PDF file to software interface. If the password protected PDF file is mixed together with the normal PDF file, please do not worry. Simply add all of them to software interface, the normal PDF will give error message. And the password protected PDF will be removed the password directly.
  • During the removing password, you will be removed to specify the output folder and name one by one. Once you specified the output folder, the removing process will end.
  • But when you remove the open password protected PDF file, there will be pop up message reminding to input the password. But you do not need to input both, normally if you  know one of the user password or owner password and input it in the dialogue box then the removing process will succeed.

Note: now if you use the GUI version, the limitation that each time you have to specify output folder can not be removed. But we will fix this matter in the next version. But this limitation can be avoided by the command line version.  This software either can be used as GUI version and command line version.

  • Please go to the installation folder and find the executable exe file named pdfdecrypt and call it in the MS Dos Windows then you can use it as command line software.

The following is the PDF Password Remover commend line parameters.
-------------------------------------------------------------------
Usage: pdfdecrypt [options]
-i [pdf file name] : decrypt PDF filename or directory.
-o [pdf file name] : PDF file will be generated.
   If you not specify the -o parameter, the default output file will overwrite t
he input PDF file.
-u                 : user password.
-w                 : owner password.
-v                 : view the PDF file after decryption.
-l [log file name] : specify log file for output message.
-?                 : help.
-h                 : help.
--------------------------------------------------------------------
Example:
     pdfdecrypt -i C:\sample.pdf -o C:\decrypt.pdf -w owner -u user -l C:\error.
log
     pdfdecrypt -i C:\sample.pdf
     pdfdecrypt -i C:\sample.pdf -o C:\out.pdf -w "owner password"
     pdfdecrypt -i C:\sample.pdf -o C:\out.pdf -u "user password"
     pdfdecrypt -i C:\pdfdir\ -o D:\ -l C:\error.log

During the using, if you have any question, please contact us as soon as possible.
EMF to Vector Converter

VeryDOC EMF to PDF Command Line Converter

   VeryDOC EMF to PDF Converter is a professional command line application which can be used to convert Metafile (EMF, WMF) to PDF in batch by command line. By this way, you can make EMF with big size to smaller PDF file which can be printed at high resolution. In the following part, I will show details about how to use this software.

Step 1. Download Metafile to PDF Command Line

  • As it is command line version software, we have compressed it to zip file. When the downloading finishes, please extract it to some folder. Then you can check the elements in it.
  • Before run the conversion, please read the website and readme.txt file carefully.

Step 2. Convert EMF to PDF

Usage: emf2pdf [options] <emf-file> [<pdf-file>]

Example:

  • When you need to convert single EMF file to PDF, please use the following template.
    emf2pdf [options] <emf-file> [<pdf-file>]
  • When converting EMF file to PDF in batch, you can use wild character or write bat file yourself. Please refer to the following template.
    emf2pdf.exe C:\*.emf C:\*.pdf
  • When you need to convert emf file to PDF/A, please refer to the following command line.
    emf2pdf.exe -pdfa C:\in.emf C:\out.pdf
    -pdfa               : Create PDF/A compliance PDF file
  • When you need to create PDF/X compliance PDF file, please refer to the following command line.
    emf2pdf.exe -pdfx C:\in.emf C:\out.pdf
    -pdfx               : Create PDF/X compliance PDF file
  • When converting emf to PDF and specify margins, please refer to the following command line.
    emf2pdf.exe -margin 100x100x100x100 C:\in.emf C:\out.pdf
  • -margin <string>    : Set page margin to PDF file
            -margin 10          : Set margin to 10pt to left
            -margin 10x10       : Set margin to 10pt to left,top
            -margin 10x10x10    : Set margin to 10pt to left,top,right
            -margin 10x10x10x10 : Set margin to 10pt to left,top,right,bottom

  • When you need to set password for the output PDF file, please refer to the following command line.
    emf2pdf.exe -ownerpwd 123 -keylen 2 -encryption 3900 C:\in.emf C:\out.pdf

-openpwd <string>   : Set 'open password' to PDF file
  -ownerpwd <string>  : Set 'owner password' to PDF file
  -keylen <int>       : Key length (40 or 128 bit)
        -keylen 0:  40 bit RC4 encryption (Acrobat 3 or higher)
        -keylen 1: 128 bit RC4 encryption (Acrobat 5 or higher)
        -keylen 2: 128 bit RC4 encryption (Acrobat 6 or higher)
As there are too many parameters, I can not list all of them. If you need to know more, please check the readme.txt file. During the using, if you have any question, please contact us as soon as possible.
HTMLPrint to Any Converter

Print HTML to Jpg and specify width and height

   VeryDOC HTMLprint to Any Converter can be used to print HTML to Jpg and specify the image width and height. You can also use this software as HTML printing tools. By it you can do the printing job and conversion job together. Jpg is one of the output image file formats, it also can output tif, gif, png and other common image file formats. When converting website to image, it allows you to set output image width and height. In the following part, I will show you how to make it work.

Step 1. Download HTMLprint to Any Converter

  • This software is command line version but for easy uploading and downloading, we have compressed it to zip file.
  • Once the downloading finishes, please extract it to some folder then you can check the elements in it.
  • Please find the readme.txt, which contains all the parameters and examples. The executable file is named as html2any.
  • If you need to check the conversion effect, please double click the bat file.

Step 2. Print HTML to Jpg

Usage: html2any.exe [options] <HTML/MHTML file or URL>

Example

  • When converting website to jpg and specify the output image quality, please refer to the following command line.
    html2any.exe -printtoimage C:\out.jpg -quality 50 http://www.verypdf.com
    -printtoimage <string>  : this is an order to print HTML document to image files
    Following this parameter, please input the full file path and specify the file name.
    -quality <int>          : Set quality (1~100) to JPEG file
    Please note that this parameter is only available for JPEG or jpg  file. By it you can control the image quality. The better the quality is, the bigger the output file size it.
  • Now let us go to solution for converting  HTML to Jpg and specify the width and height.
    html2any.exe -printtoimage C:\out.jpg -imgw 800 -imgh 1000 http://www.verypdf.com

    -imgw <int>             : Set width to out image file
    -imgh <int>             : Set height to out image file
    Here please do not be confused with those parameters. The following parameters can help you control the HTML length and width. Say if there is long HTML website but you only need 100 near the top, you can use parameter dlgheight to cut 100 from this long HTML. If you use imgh, it will convert the whole website to jpg within the long of 100.
    -dlgwidth <int>         : set width to HTML dialog
    -dlgheight <int>        : set height to HTML dialog

  • When you need to offset HTML file in X and Y directions, please use the following two parameters.

    -imgxres <int>          : Set X resolution to out image file
    -imgyres <int>          : Set Y resolution to out image file

  • When you need to control the bit count of output image file, please use parameter -imgbc which allows you to  set color depth (1, 4, 8) for out image conversion.

By here I guess you can master one way of converting HTML to Jpg and specify the output width and height. During the using, if you have any question, please contact us as soon as possible.
Advanced PDF Editor

How to make beautiful background for PDF file?

In this article, I will share one method of creating PDF with beautiful background. Normally speaking, PDF files will be created with white background. It is not because we do not want to change it as it is too complicated to change.However, if there is no Adobe application installed, you can not even edit PDF file let alone creating PDF. My method is less expensive than buying an Adobe software, I will use VeryDOC Advanced PDF Editor instead, which only charges at 89$.

Step 1. Install Advanced PDF Editor

  • This software is GUI version, so you need to install its software interface. And this application is very small, the installation process only takes a few seconds.
  • The installation is quite easy, please double click the exe file and follow the installation message.
  • Once the installation finishes, there will be an icon on the desktop. Please click the icon to launch this software.

Step 2. Import Image Background

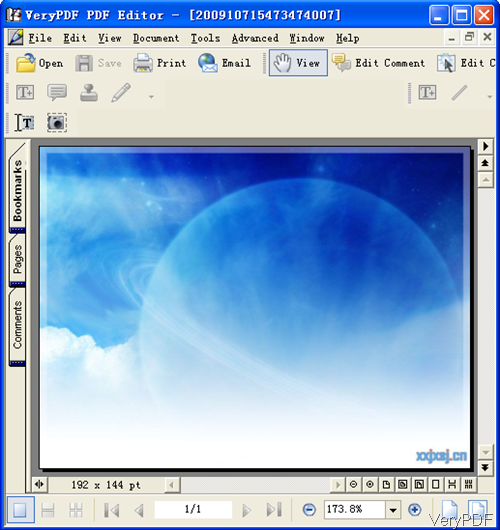
  • Please click option Open to add image background to software interface. The following snapshot is from the software interface.

software interface of PDF Editor

  • Please note when you choose image files, please change the default file type PDF to All files or else there will show nothing in the containing folder.

Step 3. Add text or other image file to the background.

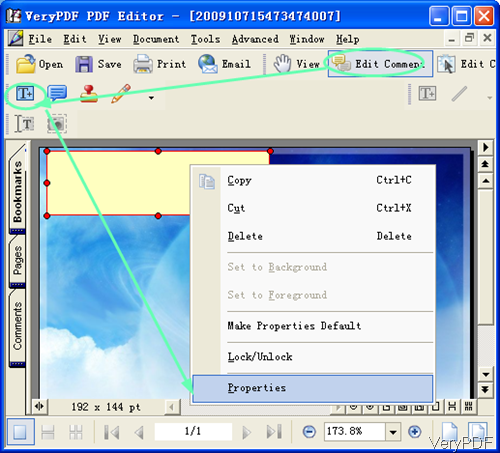
  • Please click option Edit Comment then there will some buttons turn to black from grey. Please click T icon and draw area in the image. Left click the area then you will find the dropdown list, please go to Properties. This step can be illustrated by the following snapshot.  When you need to add another image file, like company logo and others, please click the stamp icon. And the position of the text and image can be removed or moved according to your needs.

add text part

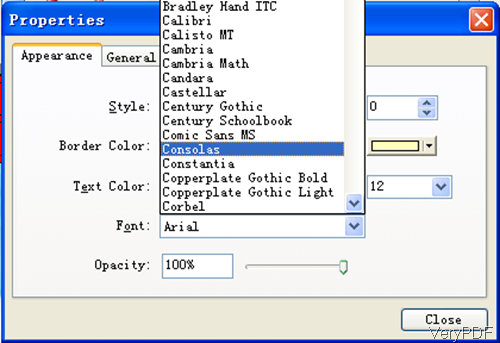
  • The following snapshot is from the Properties menu tab. There are tens of fonts style for you to choose. And please adjust the fill color same as the background image. Then you can create PDF more beautifully. And the font size can be set too. Once you  finish setting part, please click button Close to back to the main interface.

Properties menu tab 

  • Please double double click the area then you can input the content for the PDF. And the frame can be dragged as big as you need. Then you can import content for PDF file.

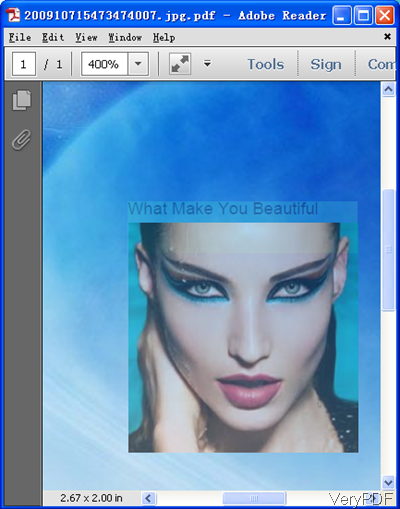
By this method, you can create PDF with beautiful background. Please have a glance from the following snapshot. During the using, if you have any question, please contact us as soon as possible.
create PDF